Forced choice and multiple choice task
This page and the experiments are under construction. The experiments may not work and may differ from the description.
This documentation describes only one part of an experiment. For other tasks, see the related pages.
Forced-choice task
A forced choice task is a research method where participants are presented with multiple options and must choose only one. This task is widely used to study language processing, comprehension, and preferences.
A forced-choice can be used in tandem with a self-paced reading task as an attention check or a way to record the outcome of the interpretation. In contrast to acceptability ratings, the forced-choice task yields discrete responses rather than grades.
Overview
I present two templates for forced-choice tasks. The first one displays a prompt and requires an answer. As soon as an answer is given, the experiment continues. There are no predetermined correct answers and feedback is not provided.
The second template displays several questions. One of the questions has a predetermined correct answer. When the wrong answer is chosen or no answer is given, they are given feedback. The participants must choose an answer or the correct answer before continuing to the next trial.
If you wish to use the forced-choice task as an attention check in your experiment, you can adapt these templates or use this old self-paced reading template.
The structure of the code is as follows:
- Setup and Configuration
- Experiment Structure (order of the experiment stages)
- Set Latin square group/select list
- Exercise
- Start of main experiment notice:
"start_experiment" - Main experiment:
rshuffle("experiment-filler", "experiment-item") - Sending results:
SendResults()
- List counter
- Start of experiment notification
- Experiment trial structure
Dependencies
- Resources
items.csvlist of exercise stimuli
- Scripts
main.js
- Aesthetics
global_main.cssPennController.css
- Modules
PennController.js
Other files, modules and aesthetics may be necessary if your experiment uses other trials, e.g. a form for recording participant information.
Stimuli file
The column names and their capitalization matters. If you change the column names and file name, adjust your code accordingly.
The stimuli are contained in the file items.csv.
The file items.csv has the structure as in the table below.
Importantly, the column names and their capitalization matters. Experiments where there is a correct answer require the column CORRECT_ANSWER. Experiments without a correct answer or where feedback is not provided can safely leave out this column.
ITEM: the item IDCONDITION: the condition IDTYPE: the stimulus type (exercise,item, orfiller)- exercise: shown only during the exercise trials in random order
- item and filler: shown only during the main experiment trials in pseudorandomized order
SENTENCE: the sentence to be displayed during ratingLIST: the list ID or Latin square group, used for experiment version presentation
| ITEM | CONDITION | SENTENCE | TYPE | QUESTION | CORRECT_ANSWER |
|---|---|---|---|---|---|
| 1 | 1 | kirchlicher Amtsinhaber | experiment | Kann sich kirchlich auf Amt beziehen? | ✔ |
| 2 | 2 | heimtückisches Anschlagsopfer | experiment | Kann sich heimtückisch auf Anschlag beziehen? | ✔ |
| 1001 | 0 | bunter Hummelgarten | exercise | Kann sich bunt auf Hummel beziehen? | ✖ |
| 1002 | 0 | wertvolles Teamevent | exercise | Kann sich wertvoll auf Team beziehen? | ✖ |
In the exercise and the main experiment, the sentences are presented in random order. In the main experiment, the sentence order is randomized and the filler order is randomized. Then, the items and fillers are shuffled in a random order.
One question with automatic continuation
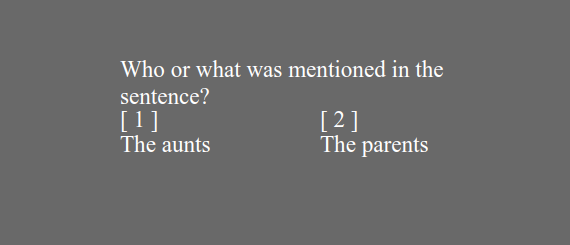
In this demo, the participants see a phrase, a question relating to the phrase, and three answer alternatives. The order of the answers is randomly shuffled. As soon as the participant choses one of the answers, the experiment continues. The participant can neither change their answer nor stop the experiment.
- Sentence Display: The sentence for each trial is displayed in bold and centered at the top of the screen.
- Question Display:
- A question from the
items.csvfile is displayed on the left. - On the right three possible responses are displayed in fixed order: a checkmark (✓) and a cross (✖).
- The experiment does not continue until a response has been given. Then it continues automatically.
- A question from the
- Data Logging: For each trial, the item number, condition, and sentence are logged.
// ###################################################################
// Trial
// ###################################################################
"items.csv", "items-" + row.TYPE,
"sentence", row.SENTENCE
,
"answer1", "✔","✖","<b>?</b>"
.settings"question", row.QUESTION
"right"
,
// Record trial data
"ITEM", row.ITEM
"CONDITION", row.CONDITION
"SENTENCE", row.SENTENCE
;
Multiple forced choice questions
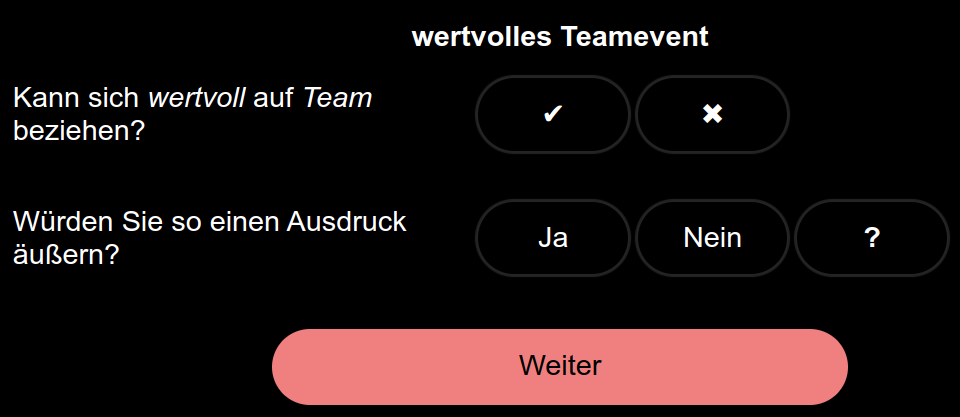
This demo shows two questions, one of which has a correct answer that must be chosen before the trial continues.
- Sentence Display: The sentence for each trial is displayed in bold and centered at the top of the screen.
- First Question:
- A scale is created with two options: checkmark ✔ (✔) and cross ✖ (✖).
- A callback is added so that once an option is selected, any error messages related to the first question will be removed.
- Second Question:
- A scale is created with three options.
- A callback is added to remove error messages once an answer is selected.
- Continue Button:
- The button checks that both questions have been answered. If not, error messages are shown in red.
- The button also checks if the response to the first question is correct. If it's incorrect, an error message is displayed indicating the wrong answer.
- Logging: For each trial, the item number, condition, and sentence are logged.
// ###################################################################
// Trial
// ###################################################################
"items.csv", "items-" + row.TYPE,
"sentence", row.SENTENCE
,
// First question and scale (correct/incorrect)
"answer1", "✔", "✖"
.settings"question", row.QUESTION
"right"
// Callback to remove the first error message on selection
"errorSelect1", "errorWrong1"
,
// Second question and scale (e.g., personal response)
"answer2", "Ja", "Nein", "<b>?</b>"
.settings"question2", "Würden Sie so einen Ausdruck äußern?"
"right"
// Callback to remove the second error message on selection
"errorSelect2"
,
// Button to check answers
"next_item", "Weiter"
// Ensure both questions are answered
"answer1".test
'errorSelect1', "Bitte beantworten Sie die erste Frage."
"Crimson"
"answer2".test
'errorSelect2', "Bitte beantworten Sie die zweite Frage."
"Crimson"
// Check if the first question is answered correctly
"answer1".testrow.CORRECT_ANSWER
'errorWrong1', "Die Antwort auf die erste Frage ist leider falsch."
"Crimson"
// Record trial data
"ITEM", row.ITEM
"CONDITION", row.CONDITION
"SENTENCE", row.SENTENCE
;
Other code
The following code customizes the progress bar text progressBarText, the automatic sending results message sendingResultsMessage (automatic message displayed when data is being sent), and the completion message completionMessage (automatic message displayed upon successful data transmission). In the absence of an ending display, the completion message is the last thing participants see in an experiment. It also sets up the counter, which ensures that a new list is started for the next participant.
// ###################################################################
// Customized messages and counter
// ###################################################################
;
;
;
"setcounter"
// ###################################################################
// Event sequence
// ###################################################################
"setcounter", "items-exercise", "start_experiment", "items-experiment",
The following code sets up the beginning of an experiment by initializing a new trial and displaying a message to the participants that indicates the experiment is starting. The participants must click on the button Continue to proceed to the next part of the experiment. It's equivallent between both templates.
// ###################################################################
// Start experiment screen
// ###################################################################
"start_experiment" ,
"The main experiment begins now."
,
"go_to_experiment", "Continue"
;
Running the experiments
To run the experiment, clone or download the repository from GitHub repository containing the experiment files or download them directly. Alternatively, use the demo links provided in the repository to test the experiment online before deploying it:
Once uploaded, launch the experiment through PCIbex to start collecting data.